몽고 DB 를 활용한 몽구스 설치 부터 구현까지 설명드리겠습니다.

몽고 DB 까지 연결을 완료 해보고 바로 몽구스로 넘어왔습니다. 몽고 DB는 구조적으로 램에다가 일단 적고, 비동기 처리를 하여 SQL 보다 약 3배 빠르고, 관계형 DB처럼 스키마가 없기 때문에 자유롭지만 이 자유도가 데이터의 일관성을 떨어뜨리는 문제를 야기 한다고 합니다. 그래서 나온게 '몽구스' 는 몽구스는 몽고 DB에 적거나 읽어올때 스키마를 적용시킬수 있는 라이브러리 입니다. 그럼 시작 해보시죠.
목차
- 몽구스 설명 및 설치 방법
- 몽구스 이용한 스키마 및 스키마 옵션 소개
- 몽구스 이용한 CRUD 구현
몽구스 설명 및 설치 방법
mongoose 는 mongo DB와 함께 사용되어 집니다. 실제로 노드 JS 에서 mongoose 를 설치하게 되면 mongo DB도 같이 설치 됩니다. 몽구스는 몽고 DB 에 입력하기 전에 조건들을 넣어 놓고 검증 할수 있게 도와주는 라이브러리 입니다. 마치 SQL 에서 String type 이라든지 타입을 미리 설정해 놓고, 일치 하지 않는 타입이 들어 왔을때 에러 혹은 저장이 안되는 기능을 몽구스를 통해서 할수 있게 됩니다.
몽구스 사이트 : https://mongoosejs.com/
Mongoose ODM v5.9.19
Let's face it, writing MongoDB validation, casting and business logic boilerplate is a drag. That's why we wrote Mongoose. const mongoose = require('mongoose'); mongoose.connect('mongodb://localhost:27017/test', {useNewUrlParser: true, useUnifiedTopology:
mongoosejs.com
몽구스 설치 방법
1. npm install --save mongoose
2. mongoose 코드 에서 불러오기
|
1
2
3
4
|
//Hoons Blog---https://rain2002kr.tistory.com------------------------------------------------------------------코드///
const mongoose = require('mongoose')
|
cs |
몽구스 이용한 스키마 만들기
몽구스 스키마를 만드는 구조는 아래와 같습니다.
|
1
2
3
4
5
6
7
8
9
10
11
12
13
14
15
16
17
18
19
20
21
22
23
24
25
|
//Hoons Blog---https://rain2002kr.tistory.com------------------------------------------------------------------코드///
var mongoose = require('mongoose');
var Schema = mongoose.Schema;
const userSchema = new Schema({
email:{
type:String,
required:true,
},
name :{
type:String
},
age:{
type:Number,
min:18,
max:50
}
},
{
timestamps:true
}
)
module.exports = mongoose.model('User', userSchema); //콜렉션에 모델을 연결한다.
|
cs |
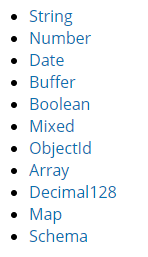
스키마 만들때, type 의 키값으로 줄수 있는 속성값은 아래와 같습니다.
기본 primative type 제외 하고 스키마에 대해 조금 알아보면, 우리가 스키마안에 다른 스키마를 넣을수도 있습니다.
ofMixed: [Schema.Types.Mixed],
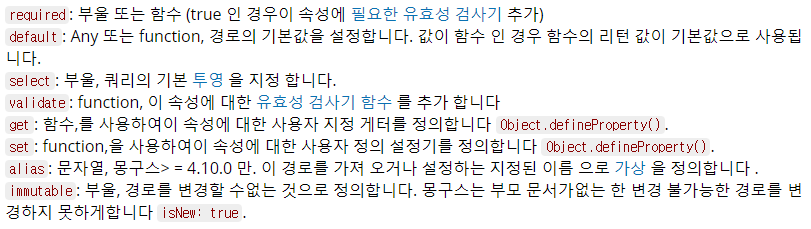
type 속성 외에도 추가 적인 속성을 줄수 있습니다.
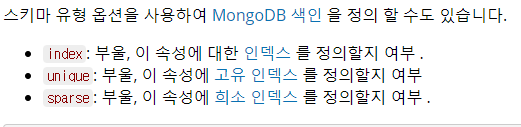
인덱스 스키마 옵션
|
1
2
3
4
5
6
7
8
9
10
|
//Hoons Blog---https://rain2002kr.tistory.com------------------------------------------------------------------코드///
var schema2 = new Schema({
test: {
type: String,
index: true,
unique: true // Unique index. If you specify `unique: true`
// specifying `index: true` is optional if you do `unique: true`
}
});
|
cs |
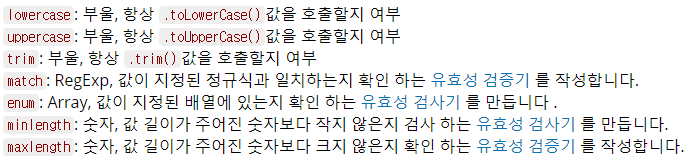
문자열 스키마 옵션
|
1
2
3
4
5
6
7
8
9
10
11
12
|
//Hoons Blog---https://rain2002kr.tistory.com------------------------------------------------------------------코드///
const schema1 = new Schema({ name: String }); // name 이 String 으로 캐스팅 됩니다.
const schema2 = new Schema({ name: 'String' }); // 같은 형태입니다.
const Person = mongoose.model('Person', schema2);
new Person({ name: 42 }).name; // "42" 가 String 으로 캐스팅 됩니다.
new Person({ name: { toString: () => 42 } }).name; // "42" 가 String 으로 캐스팅 됩니다.
// save() 를 사용한다면, 캐스트 에러가 발생할것 입니다. "undefinedd" 와 함께
new Person({ name: { foo: 42 } }).name;
|
cs |
숫자 스키마 옵션

|
1
2
3
4
5
6
7
8
9
10
11
|
//Hoons Blog---https://rain2002kr.tistory.com------------------------------------------------------------------코드///
const schema1 = new Schema({ age: Number }); // age 는 숫자로 캐스팅됩니다.
const schema2 = new Schema({ age: 'Number' }); // 같은 표현입니다.
const Car = mongoose.model('Car', schema2);
new Car({ age: '15' }).age; // 15 는 숫자로 캐스팅 됩니다.
new Car({ age: true }).age; // true 는 숫자 1로 캐스팅됩니다.
new Car({ age: false }).age; // false 는 숫자 0로 캐스팅됩니다.
new Car({ age: { valueOf: () => 83 } }).age; // 83은 숫자로 캐스팅됩니다.
|
cs |
날짜 스키마 옵션

|
1
2
3
4
5
6
7
8
9
10
11
|
//Hoons Blog---https://rain2002kr.tistory.com------------------------------------------------------------------코드///
var Assignment = mongoose.model('Assignment', { dueDate: Date });
Assignment.findOne(function (err, doc) {
doc.dueDate.setMonth(3);
doc.save(callback); // 이렇게 바로 변경하면 저장되지 않습니다.
doc.markModified('dueDate'); //바로 markModified 이걸해주고
doc.save(callback); // 요렇게 저장 하면 저장됩니다.
})
|
cs |
버퍼 스키마 옵션
|
1
2
3
4
5
6
7
8
9
10
|
//Hoons Blog---https://rain2002kr.tistory.com------------------------------------------------------------------코드///
const schema1 = new Schema({ binData: Buffer }); // binData 는 버퍼로 캐스팅됩니다.
const schema2 = new Schema({ binData: 'Buffer' }); // 같은표현 입니다.
const Data = mongoose.model('Data', schema2);
const file1 = new Data({ binData: 'test'}); // {"type":"Buffer","data":[116,101,115,116]}
const file2 = new Data({ binData: 72987 }); // {"type":"Buffer","data":[27]}
const file4 = new Data({ binData: { type: 'Buffer', data: [1, 2, 3]}}); // {"type":"Buffer","data":[1,2,3]}
|
cs |
믹스드(혼합) 스키마 타입
|
1
2
3
4
5
6
7
8
9
10
11
12
13
14
15
16
17
18
19
20
21
22
23
24
25
|
//Hoons Blog---https://rain2002kr.tistory.com------------------------------------------------------------------코드///
const Any = new Schema({ any: {} });
const Any = new Schema({ any: Object });
const Any = new Schema({ any: Schema.Types.Mixed });
const Any = new Schema({ any: mongoose.Mixed });
// Note that by default, if you're using `type`, putting _any_ POJO as the `type` will
// make the path mixed.
const Any = new Schema({
any: {
type: { foo: String }
} // "any" will be Mixed - everything inside is ignored.
});
// However, as of Mongoose 5.8.0, this behavior can be overridden with typePojoToMixed.
// In that case, it will create a single nested subdocument type instead.
const Any = new Schema({
any: {
type: { foo: String }
} // "any" will be a single nested subdocument.
}, {typePojoToMixed: false});
person.anything = { x: [3, 4, { y: "changed" }] };
person.markModified('anything');
person.save(); // Mongoose will save changes to `anything`.
|
cs |
위에 처럼 경로가 변경되었을때는 , markModified 를 전달해줘야 Mongoose 에 혼합 유형의 값이 변경되었음을 알릴수있습니다.
객체 ID
ObjectId 가 일반적으로 고유 식별자에 사용되는 특수 유형입니다.driverObjectId 인경로로 스키마를 선언하는 방법은 다음과 같습니다.
|
1
2
3
4
5
6
7
8
9
10
11
12
13
14
|
//Hoons Blog---https://rain2002kr.tistory.com------------------------------------------------------------------코드///
const mongoose = require('mongoose');
const carSchema = new mongoose.Schema({ driver: mongoose.ObjectId });
const Car = mongoose.model('Car', carSchema);
const car = new Car();
car.driver = new mongoose.Types.ObjectId();
typeof car.driver; // 'object'
car.driver instanceof mongoose.Types.ObjectId; // true
car.driver.toString(); // Something like "5e1a0651741b255ddda996c4"
|
cs |
ObjectId는 클래스이고 ObjectId는 객체입니다. toString() 을 사용하여 ObjectId를 문자열로 변환하면 24 자 16 진 문자열이 표시됩니다.
배열
몽구스는 SchemaTypes 배열과 하위 문서 배열을 지원합니다 . SchemaTypes 배열은 기본 배열 이라고 하며 하위 문서 배열 은 문서 배열 이라고도 합니다 .
|
1
2
3
4
5
6
7
8
9
10
11
12
13
14
15
16
17
18
19
20
21
22
23
24
25
26
27
28
29
|
//Hoons Blog---https://rain2002kr.tistory.com------------------------------------------------------------------코드///
var ToySchema = new Schema({ name: String });
var ToyBoxSchema = new Schema({
toys: [ToySchema],
buffers: [Buffer],
strings: [String],
numbers: [Number]
// ... etc
});
//
var ToyBox = mongoose.model('ToyBox', ToyBoxSchema);
console.log((new ToyBox()).toys); // []
//이 기본값을 덮어 쓰려면 기본값을 undefined 으로 설정해야합니다.
var ToyBoxSchema = new Schema({
toys: {
type: [ToySchema],
default: undefined
}
});
//참고 : 빈 배열은 Mixed와 같습니다.
var Empty1 = new Schema({ any: [] });
var Empty2 = new Schema({ any: Array });
var Empty3 = new Schema({ any: [Schema.Types.Mixed] });
var Empty4 = new Schema({ any: [{}] });
|
cs |
맵S (Maps) 스키마 옵션
Mongoose Maps에서 문서를 MongoDB에 저장하려면 키가 문자열이어야합니다.
|
1
2
3
4
5
6
7
8
9
10
11
12
13
14
15
16
17
18
19
20
21
22
23
24
25
26
27
28
29
30
31
32
33
34
35
36
37
38
39
40
41
|
//Hoons Blog---https://rain2002kr.tistory.com------------------------------------------------------------------코드///
const userSchema = new Schema({
// keys 항상 문자열이어야 합니다. 다음과 같은 형식으로 지정합니다. the type of values using `of`.
socialMediaHandles: {
type: Map,
of: String
}
});
const User = mongoose.model('User', userSchema);
// Map { 'github' => 'vkarpov15', 'twitter' => '@code_barbarian' }
console.log(new User({
socialMediaHandles: {
github: 'vkarpov15',
twitter: '@code_barbarian'
}
}).socialMediaHandles);
const user = new User({
socialMediaHandles: {}
});
// 이렇게 하면 GOOD
user.socialMediaHandles.set('github', 'vkarpov15');
// 이렇게 해도 동작합니다.
user.set('socialMediaHandles.twitter', '@code_barbarian');
// Bad,이렇게 하면 저장 안됩니다.
user.socialMediaHandles.myspace = 'fail';
// 'vkarpov15'
console.log(user.socialMediaHandles.get('github'));
// '@code_barbarian'
console.log(user.get('socialMediaHandles.twitter'));
// undefined
user.socialMediaHandles.github;
// 다음 두개의 'github' and 'twitter' 속성만 저장됩니다.
user.save();
|
cs |
스키마
|
1
2
3
4
5
6
7
8
9
10
11
12
13
|
//Hoons Blog---https://rain2002kr.tistory.com------------------------------------------------------------------코드///
const subSchema = new mongoose.Schema({
// 이곳에 사용할 스키마를 만드세요.
});
const schema = new mongoose.Schema({
data: {
type: subSchema
default: {}
}
});
|
cs |
몽구스 이용한 CRUD 구현
USER 스키마
|
1
2
3
4
5
6
7
8
9
10
11
12
13
14
15
16
17
18
19
20
21
22
23
24
25
|
//Hoons Blog---https://rain2002kr.tistory.com------------------------------------------------------------------코드///
var mongoose = require('mongoose');
var Schema = mongoose.Schema;
const userSchema = new Schema({
email:{
type:String,
required:true,
},
name :{
type:String
},
age:{
type:Number,
min:18,
max:50
}
},
{
timestamps:true
}
)
module.exports = mongoose.model('User', userSchema); //콜렉션에 모델을 연결한다.
|
cs |
server.js
|
1
2
3
4
5
6
7
8
9
10
11
12
13
14
15
16
17
18
19
20
21
22
23
24
25
26
27
28
29
30
31
32
33
34
35
36
37
38
39
40
41
42
43
44
45
46
47
48
49
50
51
52
53
54
55
56
57
58
59
60
61
62
63
64
65
66
67
68
69
70
71
72
|
//Hoons Blog---https://rain2002kr.tistory.com------------------------------------------------------------------코드///
const express = require('express');
const server = express();
const mongoose = require('mongoose')
//프로미스 중첩에 빠지지 않도록 도와줌
mongoose.Promise = global.Promise;
let User = require('./models/users');
const bodyParser = require('body-parser');
//const dotenv = require('dotenv')
require('dotenv').config({path:'variable.env'})
server.use(bodyParser.json());
server.get('/', (req,res)=>{
User.find()
.then((result)=>{console.log(result); res.json(result);})
.catch((err)=>{console.log('error'); console.log(err)})
})
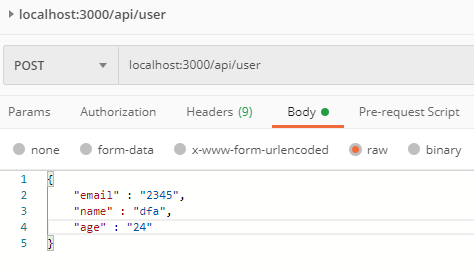
server.post('/api/user',(req,res)=>{
let newUser = new User();
newUser.email = req.body.email;
newUser.name = req.body.name;
newUser.age = Number(req.body.age);
newUser.save()
.then((user)=>{console.log(user); res.json({ message :"user Created Successfully"})})
.catch((err)=>{console.log(err); res.json({message : "user was not Created Successfully"})})
})
server.get('/api/user/:id',(req,res)=>{
User.find({name : req.params.id}
.then((result)=>{res.json(result)})
.catch((err)=>{console.log(err)}))
})
server.put('/api/user/:id',(req,res)=>{
User.findOneAndUpdate(
{name : req.params.id},{name : req.body.name, email : req.body.email, age : req.body.age}
.then((result)=>{res.json(result)})
.catch((err)=>{console.log(err)}))
})
server.delete('/api/user/:id',(req,res)=>{
User.findOneAndRemove(
{name : req.params.id}.then((result)=>{res.json(result)}).catch((err)=>{console.log(err)}))
})
function connectDB() {
let db
mongoose.connect('mongodb://localhost/test',{useNewUrlParser: true})
db = mongoose.connection
db.on('error', console.error.bind(console, 'connection error:'));
db.once('open', function() {
// we're connected!
console.log("Connect to database sucessfully")
});
}
server.listen(3000, (err)=>{
if(err) console.log(err);
else connectDB();
})
|
cs |
다음 코드를 가지고 POST MAN으로 확인한 결과 입니다.
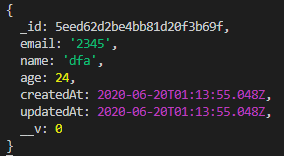
이상 입니다.
'데이터베이스 > MongoDB and Mongoose' 카테고리의 다른 글
| [Mongo DB] 몽고 DB 기초 정리 (0) | 2020.06.19 |
|---|