반응형
선택 위젯 이라고 불리는 리스트뷰, 그리드뷰, 리사이클러뷰, 카드뷰 는 모두 baseAdpter 객체를 정의후 setAdapter 를 해줘야 사용이 가능하다. 여기서는 리스트뷰를 만드는 법부터 baseAdpter 객체 정의 하기까지를 정리 해 보도록 하겠다.
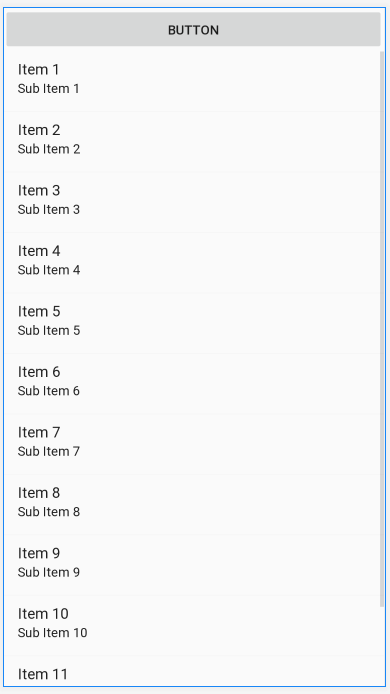
1) 메인 엑티비티에 button 하나와 리스트 뷰를 넣는다.
<?xml version="1.0" encoding="utf-8"?>
<LinearLayout xmlns:android="http://schemas.android.com/apk/res/android"
    android:layout_width="match_parent"
    android:layout_height="match_parent"
    android:orientation="vertical">
   <Button
        android:id="@+id/button"
        android:layout_width="match_parent"
        android:layout_height="wrap_content"
        android:text="Button" />

    <ListView
        android:id="@+id/listView"
        android:layout_width="match_parent"
        android:layout_height="match_parent" />

</LinearLayout>
2) 리스트뷰에 들어갈 item.xml 을 만든다.
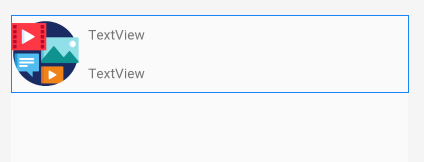
<?xml version="1.0" encoding="utf-8"?>
<LinearLayout xmlns:android="http://schemas.android.com/apk/res/android"
    xmlns:app="http://schemas.android.com/apk/res-auto"
    android:layout_width="match_parent"
    android:layout_height="wrap_content">

    <ImageView
        android:id="@+id/imageView"
        android:layout_width="140dp"
        android:layout_height="80dp"
        android:layout_weight="1"
        app:srcCompat="@drawable/img4" />

    <LinearLayout
        android:layout_width="match_parent"
        android:layout_height="match_parent"
        android:layout_weight="1"
        android:orientation="vertical"
        android:layout_marginLeft="10dp"
        >

        <TextView
            android:id="@+id/textView"
            android:layout_width="match_parent"
            android:layout_height="match_parent"
            android:layout_weight="1"
            android:text="TextView"
            android:layout_gravity="center|center_vertical"
            android:gravity="left|center"
            />

        <TextView
            android:id="@+id/textView2"
            android:layout_width="match_parent"
            android:layout_height="match_parent"
            android:layout_weight="1"
            android:gravity="left|center"
            android:text="TextView"
            />
    </LinearLayout>
</LinearLayout>
3) item.xml 을 inflation 시키기 위한 itemView.java 파일을 만든다.
public class SingerItemView extends LinearLayout {

    ImageView imageView;
    TextView textView;
    TextView textView2;

    public SingerItemView(Context context) {
        super( context );
        init(context);

    }

    public SingerItemView(Context context, AttributeSet attrs) {
        super( context, attrs );
        init(context);
    }

    private void init(Context context){
        LayoutInflater inflater = (LayoutInflater) context.getSystemService( Context.LAYOUT_INFLATER_SERVICE );
        inflater.inflate( R.layout.singer_item, this, true );

        imageView = (ImageView) findViewById( R.id.imageView );
        textView = (TextView) findViewById( R.id.textView );
        textView2 = (TextView) findViewById( R.id.textView2 );


    }
    /* 외부에서 set할수 있도록 setName,mobile,image 메소드생성  */
    public void setName(String name){
        textView.setText(name);
    }
    public void setMobile(String mobile){
        textView2.setText( mobile );
    }

    public void setImageView(int resId){
        imageView.setImageResource( resId );
    }

}
4) baseApater안에 ArrayList Type으로 쓰일 <xxxItem> class를 만든다.
public class SignerItem {
    String name;
    String mobile;
    int resId;

    public SignerItem(String name, String mobile, int resId) {
        this.name = name;
        this.mobile = mobile;
        this.resId = resId;

    }

    public String getName() {
        return name;
    }

    public void setName(String name) {
        this.name = name;
    }

    public String getMobile() {
        return mobile;
    }

    public void setMobile(String mobile) {
        this.mobile = mobile;
    }

    public int getResId() {
        return resId;
    }

    public void setResId(int resId) {
        this.resId = resId;
    }

    @Override
    public String toString() {
        return "SignerItem{" +
                "name='" + name + '\'' +
                ", mobile='" + mobile + '\'' +
                ", resId=" + resId +
                '}';
    }
}
5) Main Activity 안에 BaseAdapter 를 상속하는 adapter를 만든다. adpter 에다가 additem혹은 delitem을 통해 데이터를 넣거나 삭제한후 아래와 같이 listView를 만들고 그 리스트뷰 에다가 adpter를 set해주면 된다.
public class MainActivity extends AppCompatActivity {
    ListView listView;
    SignerAdpter adpter;
    Button button;
    EditText editText,editText2;
    @Override
    protected void onCreate(Bundle savedInstanceState) {
        super.onCreate( savedInstanceState );
        setContentView( R.layout.activity_main );

    adpter = new SignerAdpter();
    listView = (ListView) findViewById( R.id.listView );

    adpter.addItem( new SignerItem( "소녀시대", "010-1000-1000", R.drawable.img2 ) );
    adpter.addItem( new SignerItem( "티아라", "010-2000-3000", R.drawable.img3 ) );
    adpter.addItem( new SignerItem( "블랙핑크", "010-3000-4000", R.drawable.img4 ) );
    adpter.addItem( new SignerItem( "개성시대", "010-4000-5000", R.drawable.img5 ) );
    adpter.addItem( new SignerItem( "여성시대", "010-5000-6000", R.drawable.img6 ) );

    button = (Button) findViewById( R.id.button );
    editText = (EditText) findViewById( R.id.editText );
    editText2 = (EditText) findViewById( R.id.editText2 );

   listView.setOnItemClickListener( new AdapterView.OnItemClickListener() {
       @Override
       public void onItemClick(AdapterView<?> parent, View view, int position, long id) {
           SignerItem item = (SignerItem) adpter.getItem( position );
           Toast.makeText( getApplicationContext(), item.getName() + ":" +item.getMobile(), Toast.LENGTH_LONG ).show();

       }
   } );

    button.setOnClickListener( new View.OnClickListener() {
        @Override
        public void onClick(View v) {
            String name = editText.getText().toString();
            String mobile = editText2.getText().toString();

            adpter.addItem( new SignerItem( name,mobile,R.drawable.img2 ) );
            adpter.notifyDataSetChanged();
        }
    } );
    listView.setAdapter( adpter );
    }

    class SignerAdpter extends BaseAdapter {
        ArrayList<SignerItem> items = new ArrayList<SignerItem>(  );

        public void addItem(SignerItem item){
                items.add( item );
        }

        @Override
        public int getCount() {
            return items.size();
        }

        @Override
        public Object getItem(int position) {
            return items.get( position );
        }

        @Override
        public long getItemId(int position) {
            return position;
        }

        @Override
        public View getView(int position, View convertView, ViewGroup parent) {
            SingerItemView view =  new SingerItemView(getApplication());

            SignerItem item = items.get( position );
            view.setName( item.getName() );
            view.setMobile( item.getMobile() );
            view.setImageView( item.getResId() );

            return view;
        }
    }

}
※ 그리드뷰는 아래 셋팅만 있고 나머지는 모두 동일하다.
gridView.setNumColumns( 3 );결론 : 상기 예제에서 내용 복사해서 약간의 수정으로 리스트뷰를 만들수 있음. 그리드뷰는 완전히 동일한대신에 컬럼갯수를 리스트뷰와 달리 1~가변으로 넣는 값에따라 자동으로 줄이 늘어나거나 줄어듬.
'안드로이드 프로그래밍[JAVA Code] > 선택 위젯' 카테고리의 다른 글
| 리싸이클러뷰 : (0) | 2019.12.19 |
|---|---|
| 선택 위젯 : 스피너 : 기본 Array Adapter 설정 (0) | 2019.12.04 |